Disclaimer. This article describes findings when working with SSMA version 8.5 on one large PoC. The results in your environment might be different. In case you are relying on the estimates provided below, treat them as reference only.
In this short article I will briefly describe some of the findings from a large-scale PoC we were working on recently. This includes what was successful and what was not, a few time estimations and certain problems we faced using the tool.
The PoC included migration / assessment of ~10 000 tables and ~40 000 views from Oracle to Azure Synapse Analytics. The overall dataset size was ~ 10 TBs.
Our initial plan was to use SSMA for Oracle to migrate DDLs and long-tale data from Oracle and use spool offloading and Polybase to load data into Azure Synapse for the large tables. This plan was partially implemented and partially changed over the course of the PoC.
The process of working with SSMA for Oracle is:
- Create an SSMA project. Please do not forget to give your project a meaningful name as it cannot be renamed later. When creating the project, please select the proper target (in our case it is Azure Synapse Analytics or former name of Azure SQL Datawarehouse).
- Connecting to Source (Oracle). I started with applying Oracle Data Pump packages (DDL only) to one of my test Oracle instances. After that I used this instance for the initial (test) conversion.
Note. Please refer to SSMA docs for a current set of permissions required for SSMA to run.
Recommendation. This is not possible to repoint the migration project to another source / target instance. You will have to start all over again. Reading metadata from Oracle was one of the longest processes (it took us around 24 hours to read the metadata for ~8000 tables and ~22000 views) so it is recommended to start the conversion with the real source database (we have to read metadata only once per project). Note. Conversion from production DB was 30% more effective than from imported Oracle DB.
Recommendation. When selecting the schemas, try to group these schemas in several projects evenly in terms of number of objects to transform and data to migrate. This will allow you to work on several parallel loads.
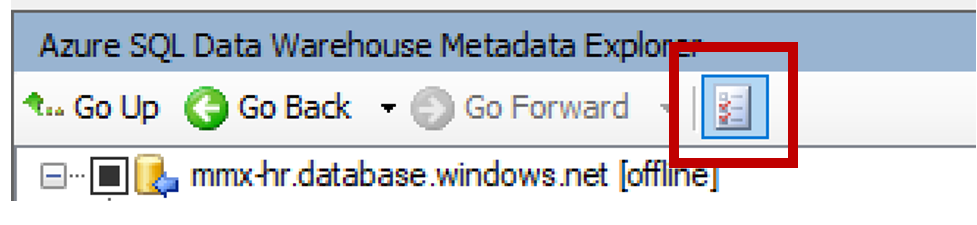
Note. All the actions described below are triggered with the action buttons from toolbar menu. The scope for the action is defined by selecting the objects in the tree view (Metadata Explorer) to your left. You may need to select some specific objects out of thousands so you will find “Advanced Object Selection” functionality very useful. Just use this small button ?
Note. Reading metadata from Oracle doesn’t have any progress bar.
- Connecting to Target (Synapse). Please check that you can connect from SSMA host to Synapse before starting the connection Wizard (it will simplify the connection troubleshooting). Please refer to Synapse Docs to check how to connect to your Synapse Analytics instance.
Recommendation. We recommend to use the smallest DW at this stage (DW100) to avoid high costs as size of the DW and resource class has no impact on DDLs conversion / application performance.
Recommendation. When creating Azure DW users, keep in mind the following. Workload classes will be assigned to users. If you are planning to run the SSMA projects for Data migration later on, you need to create as many users as parallel loads later on and assign proper resource class as per Synapse Documentation. Note. In our case I have created an xl resource class user which later affected our ability to execute parallel SSMA projects for data load.
Recommendation. Before performing any further actions, I recommend tweaking a couple of parameters on SSMA side. First is to go to Tools->Global Settings->Logging and set up all the Logging to Debug mode. It may help you and support teams later. Second, open Tools->Project Settings->Synchronization and redefine Query Timeout (in case doing assessment in parallel with something else, I use 100 as a default). This will keep you safe from timeouts in most of the cases.
- Reading metadata from Oracle. You can select the schemas for which the migration should be performed. This will trigger the metadata reading process which takes a while. Reference point for me is around 15 minutes per 100 tables.
- Creating the Migration report. You can create an html-based migration report with all the migration efforts estimated and mitigation actions listed.
Note. In my environments this report was fully shown only in Microsoft Edge browser. In all other browsers most of the valuable information was not displayed. However, please also note that I did not spend much time trying to fix this.
Report produces two main views.
- Statistics View (How many objects / components were migrated)
- Code View (How particular object was converted on the code level)
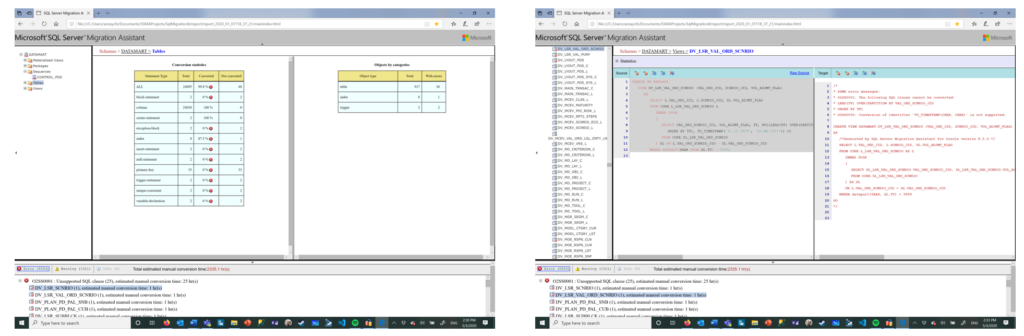
Note. Reports are stored within the SSMA Projects/[ProjectName]/report/report[date-time]. Use mainindex.html to access the report.
- Convert Schema. This action transforms the DDLs and code ignoring exceptions highlighted in the report to the target (in our case Azure Synapse). Please note that this action will not apply the changes to the target – only saving it within a scope of the project.
Note. This action typically takes some time depending on the size of the scope selected. In the worst case ~8000 tables and ~20000 views it took around 36 hours to do all the conversions. We benefit from splitting the work in several parallel projects (on different schemas to avoid inconsistency in the project status). Conversion for 100 tables took me ~20 minutes.
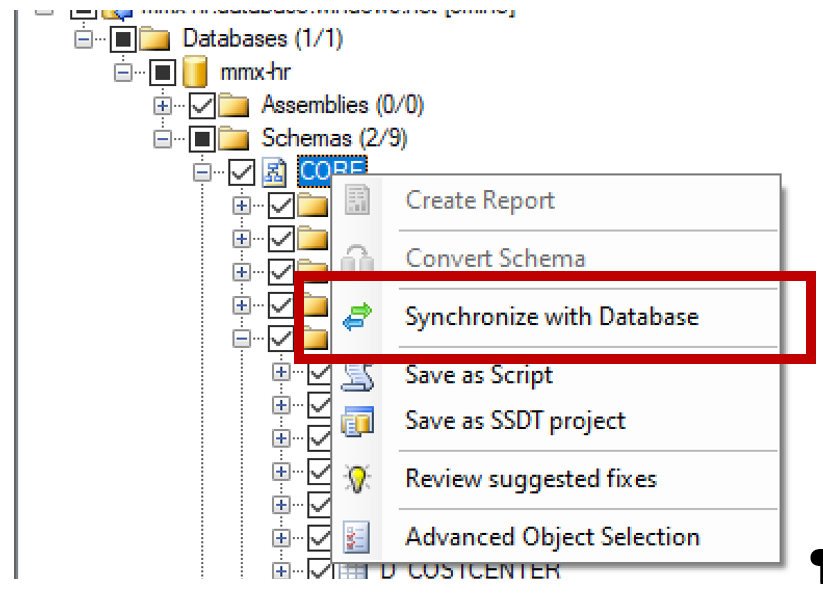
- Apply Schema. To apply schema to the target, just right click on the target DB and select Synchronize with Database. This will call a pop-up windows with summary of all the changes to be performed on the database.
This operation is faster than previous ones but still takes roughly 10-15 minutes per 100 tables and on the large scale also takes up to 12-18 hours on 8000 tables / 20000 views.
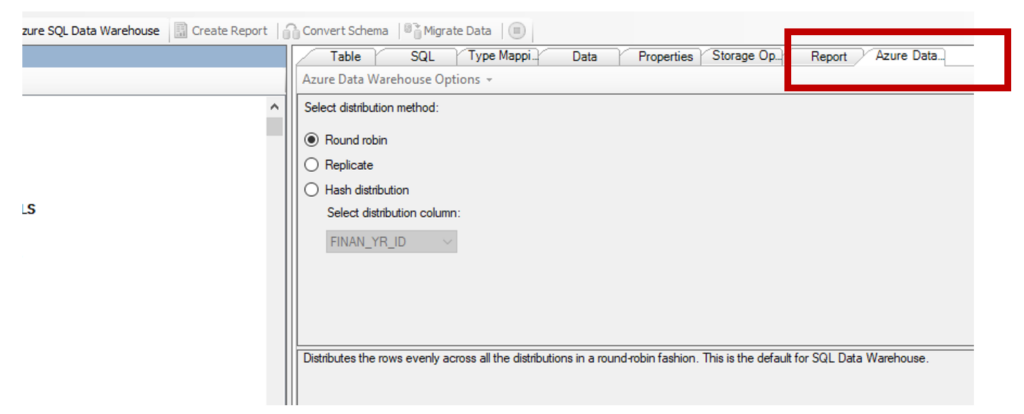
Note. If you already have some ideas on how the distribution will look like in Azure Synapse, you can use SSMA to define the distribution style. To do that please use the following tab.
- Migrate Data. SSMA can perform data migration using the direct read from Oracle. It will take care of data types conversion, batching and writing to Azure Synapse.
Note. In my case I was able to migrate 7 GB table in 15 minutes. At the same time due to the different reasons we experienced high error rate (~10% of tables were not able to migrate). In one of the threads we were able to migrate ~800 tables in 12 hours. The overall size of this dataset was close to 400 GB.
Note. To track the migration status, use Data Migration Error log (location can be found in Tools-> Global Settings->Logging.
In case of using SSMA the project ends up here. However, in our case we were required to do several more hands-on things:
- Offload and migrate large tables. For this we used a generator based on the functionality of COPY INTO command (you may face some of the issues with customer UTF characters as delimiters) and EXTERNAL TABLES.
- Perform manual changes in SQL code and apply them to DW. This was major hands-on activity
- Perform testing.
As you can imagine two last points are the most complex ones ? where you may need to allocate most of the time and efforts. This is a very vast topic and please refer to Azure Data Migration Guide for further information.
In conclusion, SSMA for Oracle is a great tool with tons of functionality which alone can be used for small and medium migrations within reasonable time frame. It also should be considered as one of the key tools in the toolbox for large DB migrations.
Stay safe and have a great day!